Build a No‑Code AI Sales Assistant with n8n and Google Vertex AI
Introduction
Imagine automating your sales outreach so that every new lead gets a personalized email within minutes – all without writing a single line of code. In this tutorial, we’ll show you how to use n8n (an open-source no-code workflow tool) together with Google Vertex AI to create an AI-powered sales assistant. Our example workflow will automatically draft a welcome email for new sales leads using AI, demonstrating how you can boost follow-up speed and productivity while keeping data compliant with European privacy standards.
We’ll cover: what n8n is and why it’s great for no-code AI, how to connect n8n with Google’s Vertex AI, and a step-by-step real-life sales workflow (lead comes in → AI drafts an email → email is sent or saved for review). By using Vertex AI with EU data residency, we ensure all data stays in Europe, which is important for GDPR compliance and privacy. Let’s dive in!
What is n8n and Why Use It for No‑Code AI Workflows?
n8n is an extendable workflow automation tool – think of it as a powerful open-source alternative to Zapier that you can even self-host . It allows you to connect apps and services together on a canvas with drag-and-drop nodes, enabling you to create custom automations without coding. With over 400 integrations (from CRM systems to Google Sheets to AI APIs), n8n makes it easy to build complex workflows that integrate everything you need .
Why n8n for AI? n8n now includes built-in nodes for AI services (like OpenAI and Google Vertex AI), so you can incorporate AI-powered steps into your workflows without writing code. For example, you could take text from a form, send it to an AI model for analysis or content generation, then use the result in another app – all visually. n8n’s intuitive interface lowers the barrier to experiment with AI in automation, meaning even non-developers can create smart assistants that boost productivity. And because n8n can be self-hosted, you have full control over where your data flows, which is a big plus for privacy.
Connecting n8n with Google Vertex AI (EU-Friendly Setup)
Google Vertex AI is Google Cloud’s machine learning platform that offers powerful generative AI models (like PaLM 2/Gemini for text, image generation, etc.) . We’ll use Vertex AI for our AI assistant because it lets us host our AI processing in Europe, keeping data local and compliant. Google recently launched multiple Vertex AI regions (including the Netherlands, France, Germany, Belgium, etc.), so users can ensure their AI data stays in their chosen region . This addresses data sovereignty concerns under GDPR, as it avoids sending EU personal data to U.S. servers .
To connect n8n with Vertex AI, follow these steps:
Create a Google Cloud Project & Enable Vertex API – Sign in to the Google Cloud Console and create a new project (or use an existing one). Enable the Vertex AI API for this project. Tip: Google also requires enabling the “Cloud Resource Manager API” along with Vertex AI . In your Google Cloud Console, go to APIs & Services > Library, search for “Vertex AI API” and click Enable, and also enable “Cloud Resource Manager API”.
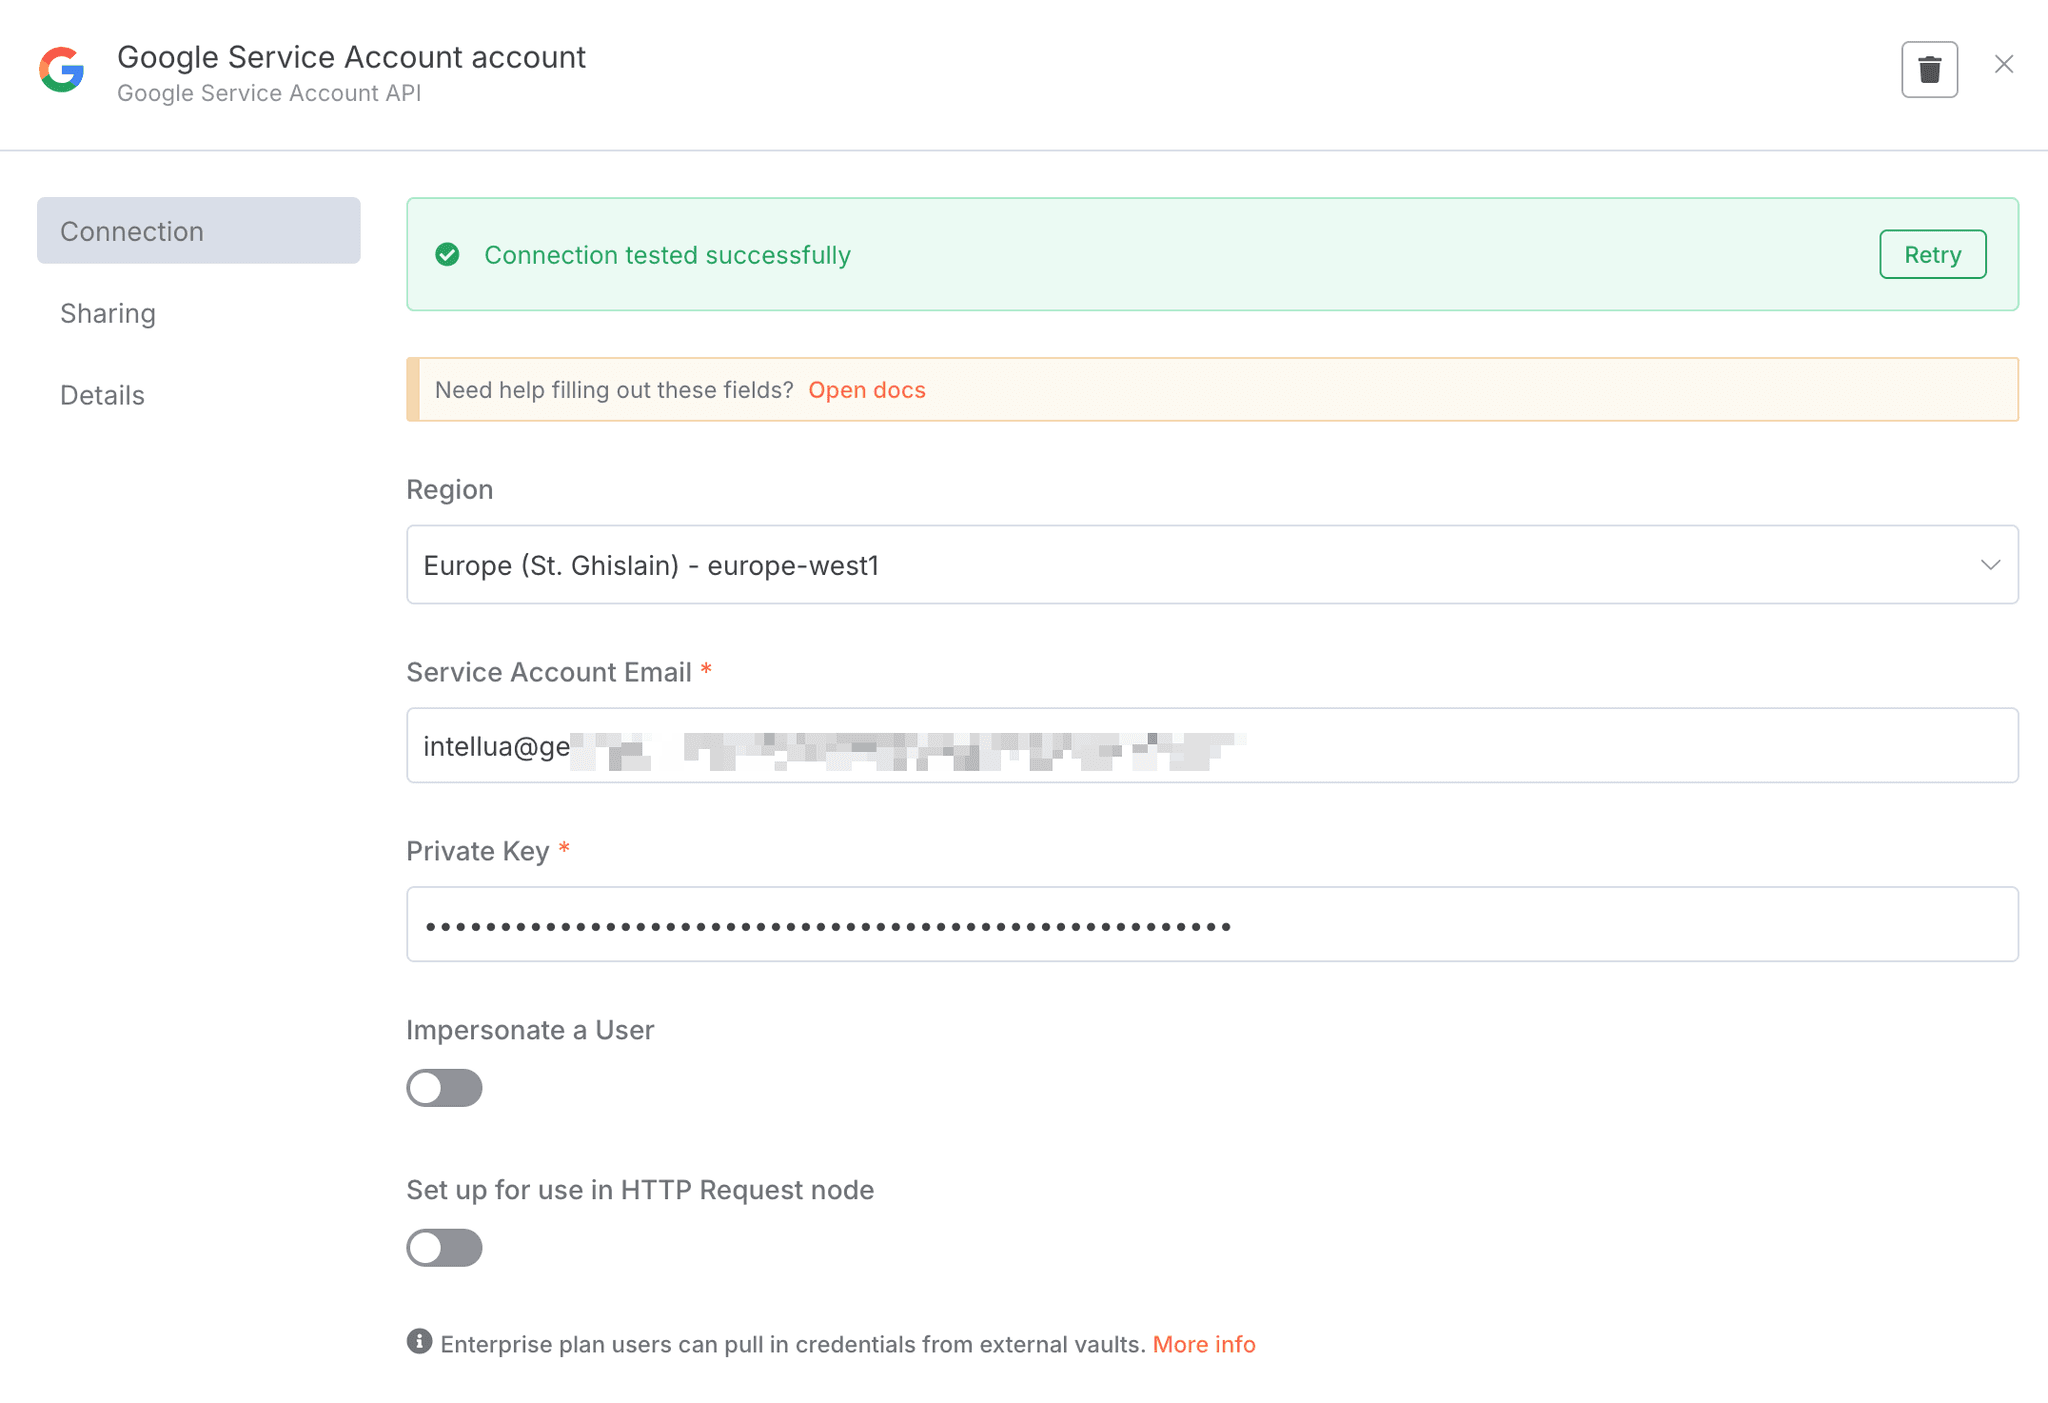
Set Up Credentials (Google Service Account) – Vertex AI uses Google Cloud authentication. The simplest way in n8n is using a Service Account credential. In Google Cloud: go to APIs & Services > Credentials, click Create Credentials > Service Account. Give it a name (e.g. “n8n Vertex Service Account”) and assign any necessary roles (for Vertex AI, the default roles are usually sufficient for making predictions). After creating the service account, go to its Keys section and create a new key (choose JSON format). This will download a JSON key file to your computer .
Add the Credential in n8n – In your n8n editor, open the Credentials menu and add a new credential for “Google Service Account”. You will be prompted to enter the Service Account Email and Private Key from the JSON file. Copy the client_email from the JSON into the email field, and the private_key (without the quotes or \n line breaks) into the key field . Important: You’ll also see a field for Region – select an EU region here (for example, europe-west4 (Netherlands) or another European location). This ensures Vertex AI processes your requests in Europe. (In our example screenshot below, a U.S. region is shown, but you should pick an EU region for GDPR compliance.)
Configuring the Google Service Account credential in n8n (you would enter your Service Account Email, Private Key, and select an EU region here).
Verify Connection – After filling in the details, click Save. n8n will attempt to authenticate with those credentials. If everything is correct, you’ll see a green success indicator . Now n8n is connected to Vertex AI! You have the secure bridge set up – ready to send data from n8n to Google’s AI models while keeping the data within Europe.
Example Workflow: AI-Powered Sales Outreach (Step-by-Step)
Now for the fun part – building our no-code AI workflow. In this scenario, when a new sales lead comes in (say from a web form or CRM), our workflow will automatically do two things: generate a personalized welcome email using Vertex AI, and then send that email (or save it as a draft) via SendGrid. This saves the sales team time on drafting emails and ensures every lead gets a quick, tailored response. We’ll use simplified steps so even beginners can follow along.
Overview of the Workflow Steps
Trigger: New lead captured (could be via a form, CRM, or manual trigger for testing).
AI Draft Email: Vertex AI generates a personalized email based on the lead’s information.
Send Email: The drafted email is sent out (or saved as a draft) via SendGrid automatically.
Below we’ll walk through each step with screenshots from the n8n interface.
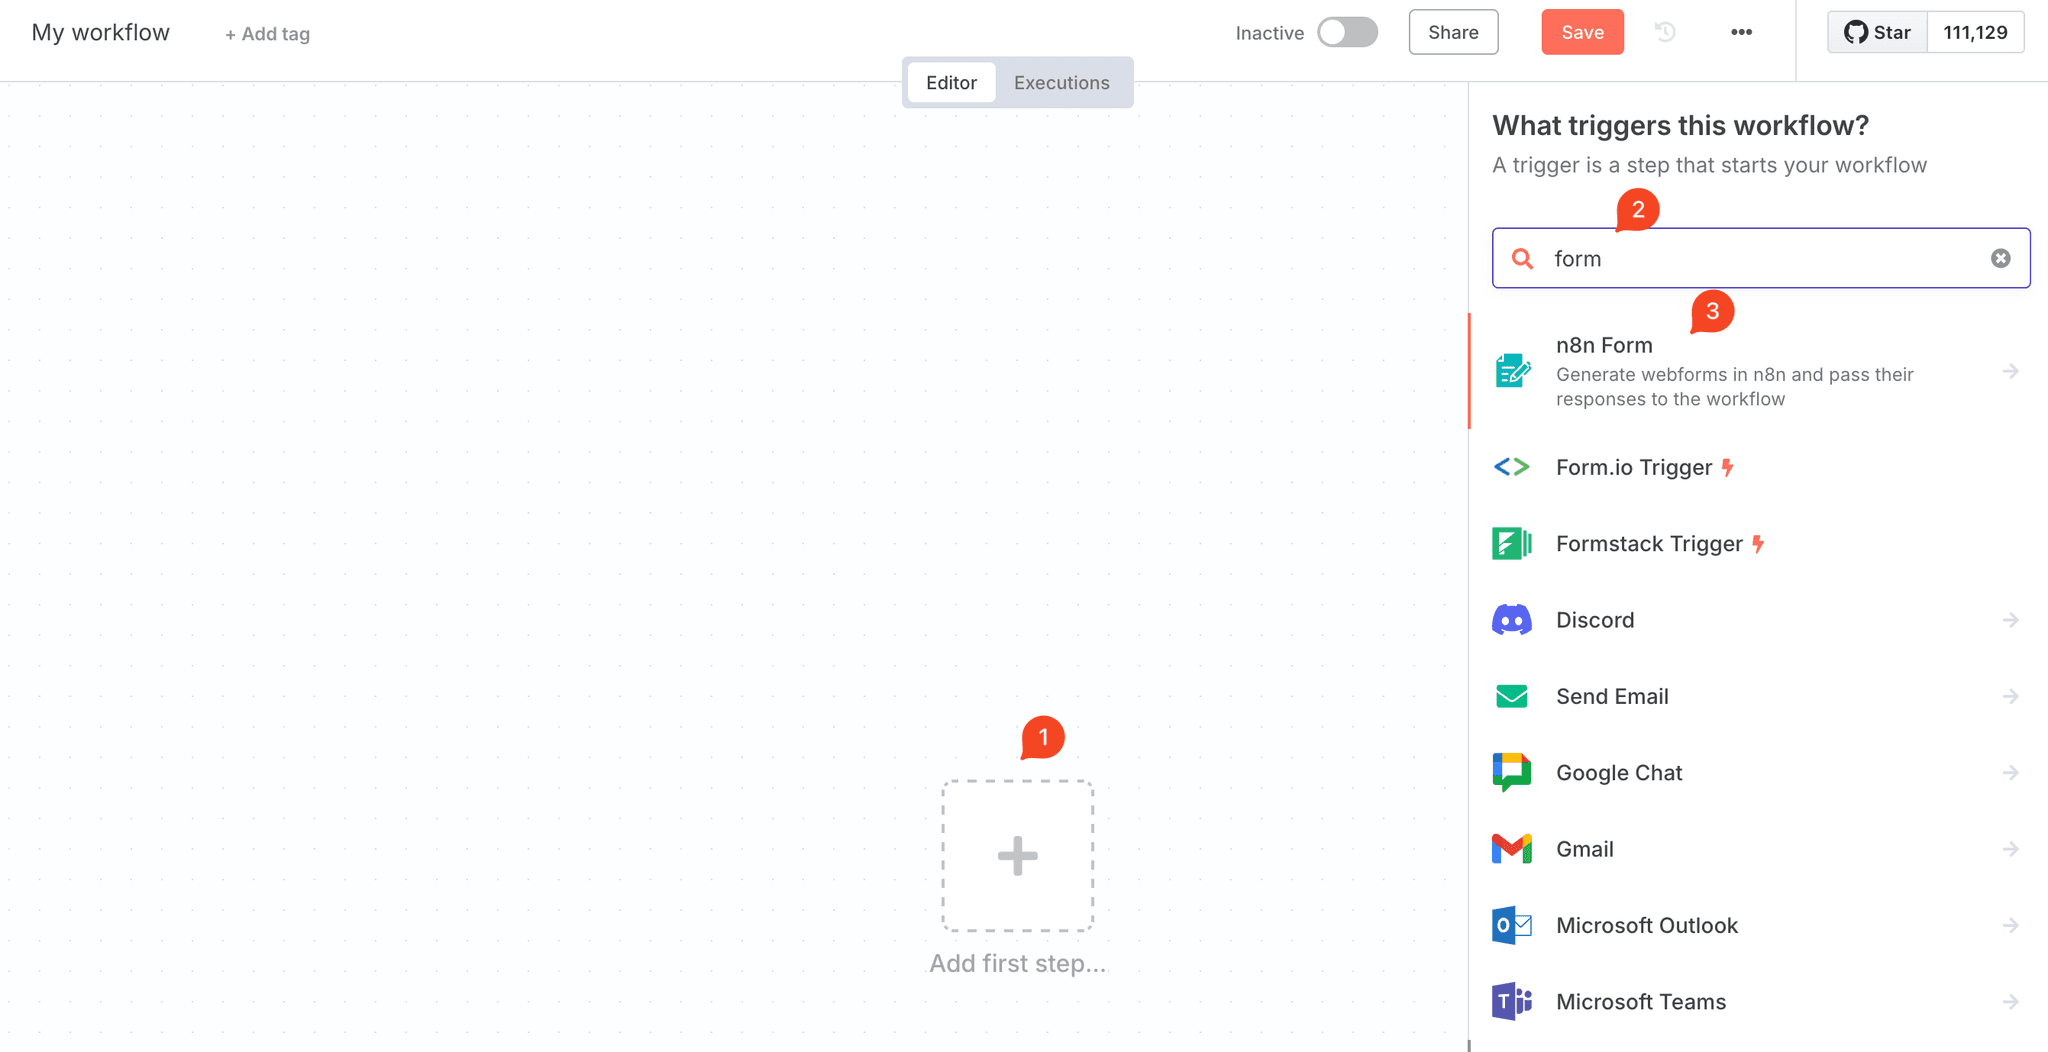
1. Trigger on a New Lead Submission
First, create a new workflow in n8n and add a trigger node that starts the flow whenever a new lead is received. In a real scenario, this could be a Webhook trigger (if your lead form makes a web request to n8n), or an integration with your form/CRM (for example, n8n has triggers for apps like Typeform, HubSpot, etc.). For simplicity, you can also use the Manual Trigger node to run the workflow manually for testing.
In our workflow, we’ll assume we have the lead’s data available when the trigger fires – for example: the lead’s name, company, and what they’re interested in. (If you’re testing manually, you can use an n8n Set node after the trigger to mock up some lead data, e.g. name = “John Doe”, company = “Acme Corp”, interest = “social media marketing”., email = "your email") We used a sample n8n form as can be seen below.
2. Generate a Personalized Email with Vertex AI
Next, add the Google Vertex AI node to generate content. n8n offers a “Google Vertex Chat Model” integration which lets us send prompts to Vertex AI’s text-generation models. Drag this node onto the canvas and connect it after the trigger. In the Vertex node’s settings, choose the Credential (the Service Account credential we created earlier) and select your Google Cloud Project ID from the dropdown . Then choose a Model – for text generation, you might select one of Google’s latest models (e.g. gemini-2.0-flash or similar).
Now, compose the prompt that will tell the AI what to write. Since we want an outreach email, the prompt can be something like:
“Write a friendly, professional welcome email to a new lead. The lead’s name is {{ $json.name }}, they work at {{ $json.company }}, and they are interested in {{ $json.interest }}. Introduce our company, show we understand their needs in {{ $json.interest }}, and suggest scheduling a call for more info. Keep the tone warm and helpful.”
Notice the use of {{$json[...]}} – in n8n, this is how you insert data from previous nodes (our trigger) into the prompt. The Vertex AI node will send this prompt to the model and get back a generated email text. You can configure options like maximum length or temperature (creativity) if needed, but the defaults are fine for now.
We also used the following system prompt:
You are an AI assistant made to write responses to e-mails.
# Persona
You work for Intellua, an AI services company in Antwerp, Belgium. Contact info for footer:
* Phone: +32 487 01 58 16
* Email: [email protected]
* Name: Lode Kennes
# Important
You only reply with the response body, not a subject or any other text.
When you execute the workflow (with a test lead), the Vertex AI node will output the AI’s response, which includes the drafted email text. You can click the node to inspect the output – you should see the email content in the JSON. For example, the AI might return: “Hi John, Thanks for reaching out… (etc.)” as the email body.
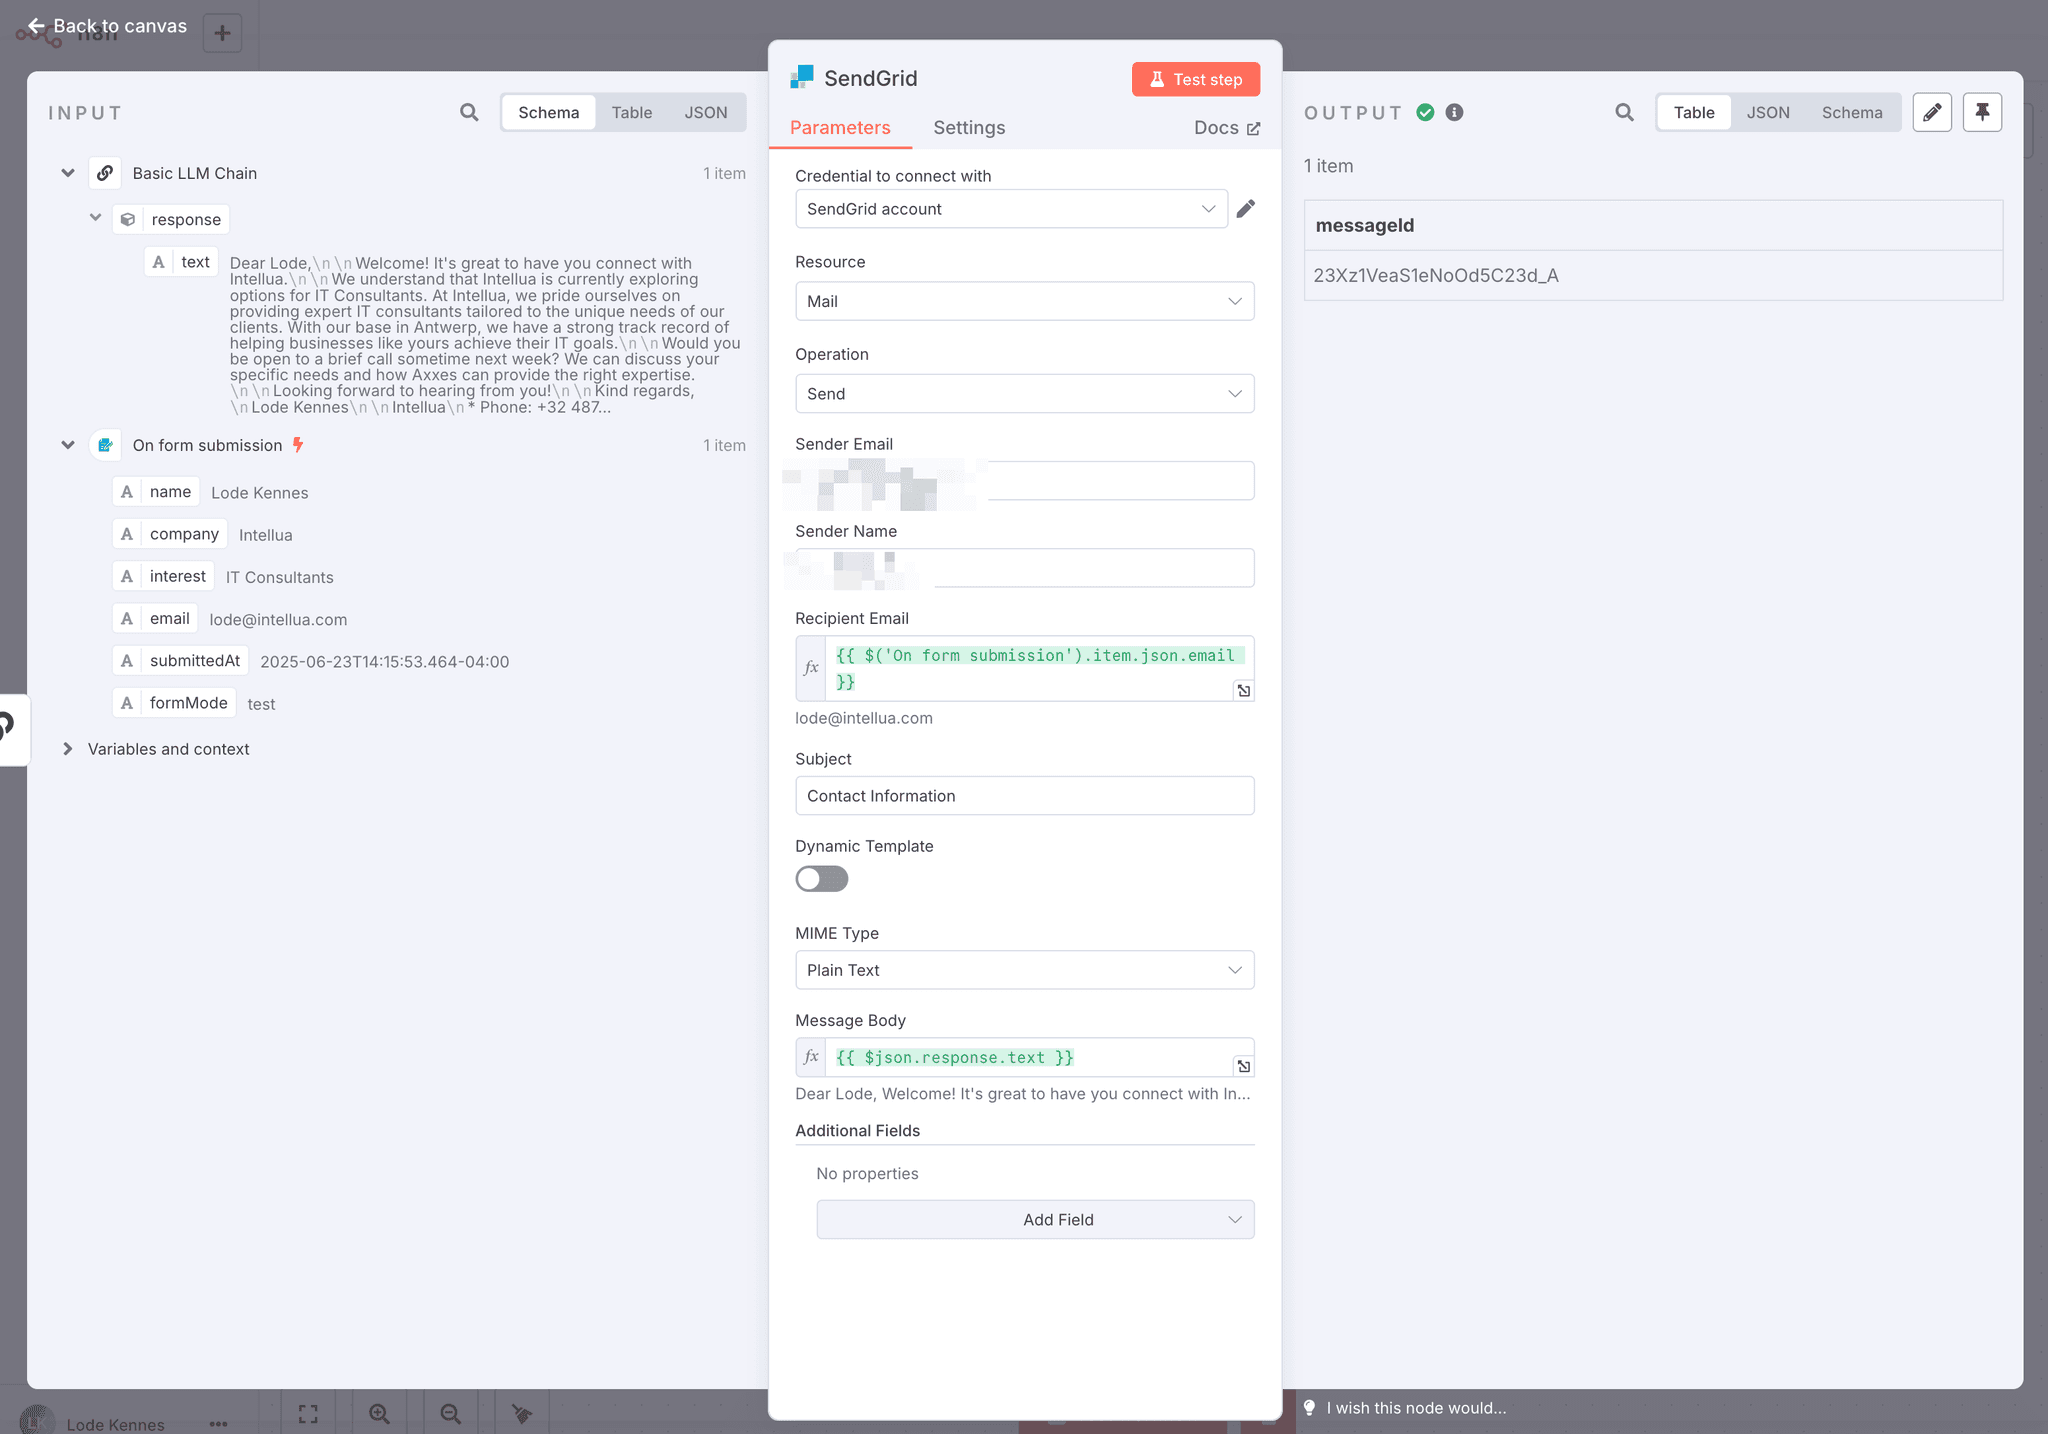
3. Send the Email via SendGrid (Automation with Human Check)
Finally, add a SendGrid node (or your preferred email service node) to handle sending the email. Connect it after the Vertex AI node. In the SendGrid node, authenticate it with your SenGrid account (you may need to set up a credential in n8n for SendGrid). Set the action to “Send Email” (or you can use “Create Draft” if you prefer to have a human review before sending).
For the email fields: set the Recipient to the lead’s email address (this might come from your trigger data – e.g. {{ $('On form submission').item.json.email }} from the lead info). Set the Subject to something relevant, like "Welcome to [Your Company]" or even have the AI generate a subject. And for the Body, use the output from the Vertex AI node – you can reference it with an expression: select the Vertex node’s output (the drafted email text). In n8n, you can often just drag the field from the previous node’s output on the left panel into the SendGrid node’s body field.
Now, when the SendGrid node runs, it will take the AI-generated text and send the email. If you chose “Create Draft” instead, it will save the draft in your SendGrid account. This “AI + automation” combo means the lead gets a prompt, personalized response without you lifting a finger, but you still have the option to review if needed (best of both worlds!).
Workflow Diagram: Here’s what the final workflow might look like in the n8n editor, with a manual trigger, the Vertex AI node, and a SendGrid node connected in sequence:
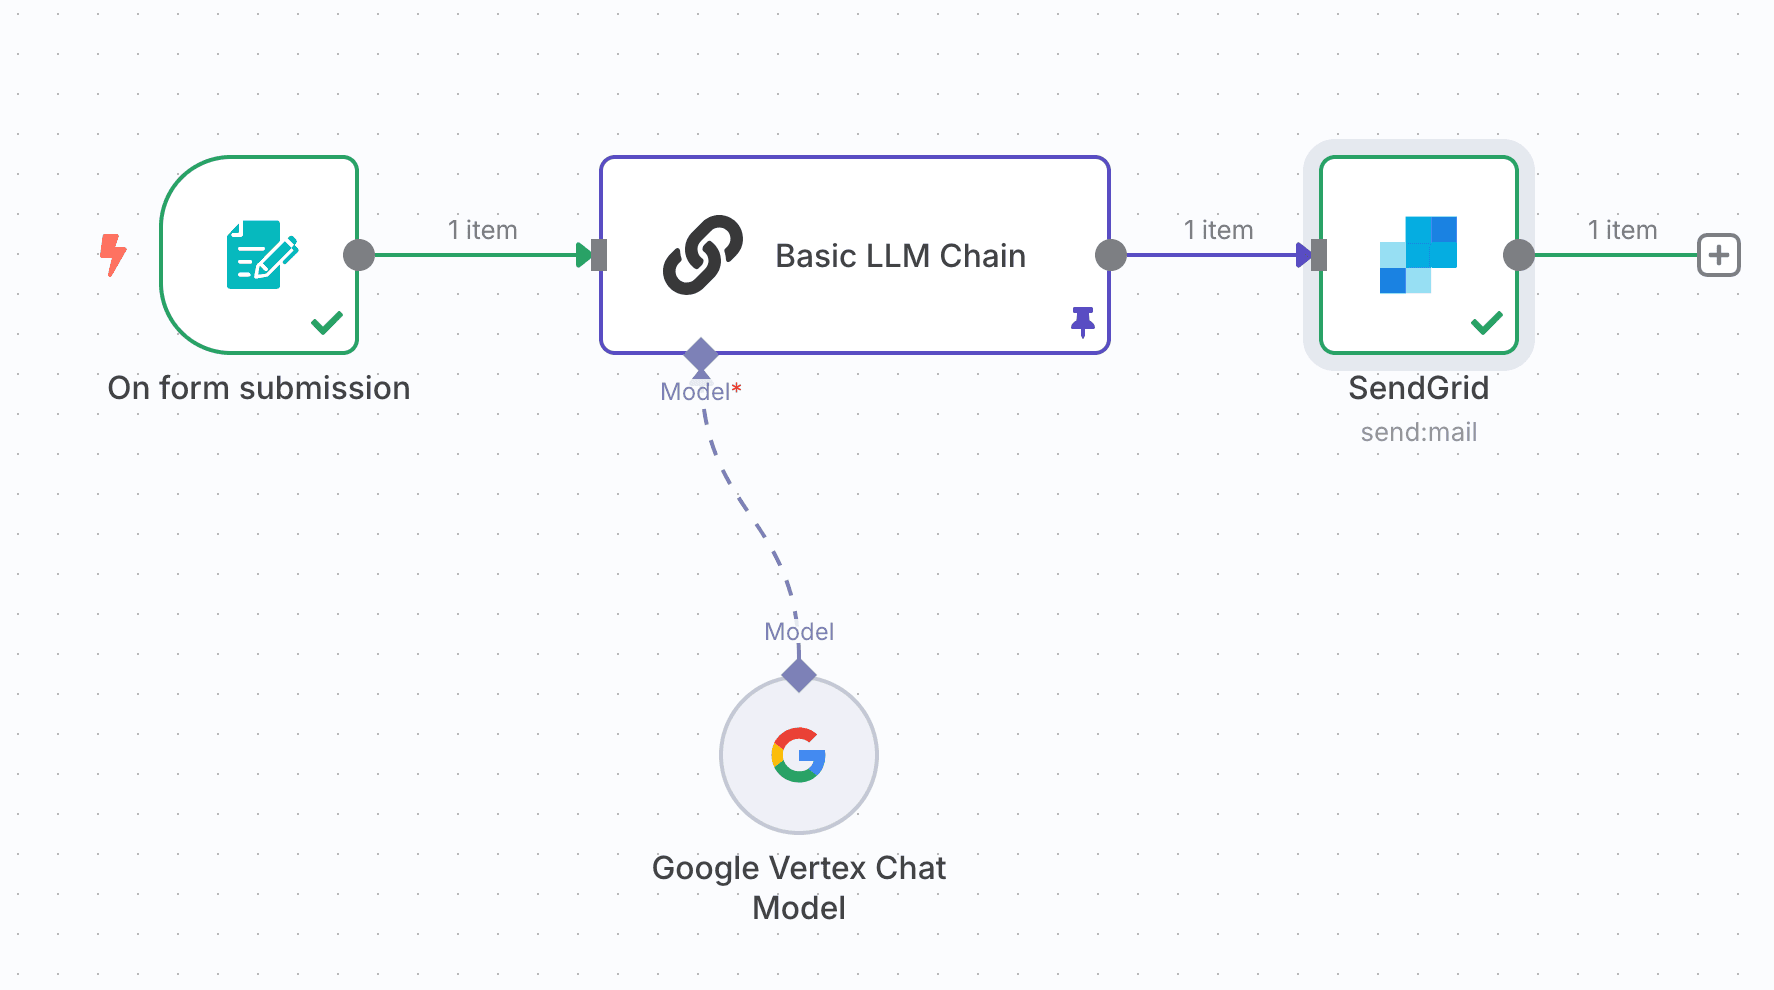
An example n8n workflow for AI-driven lead outreach: the trigger (left) passes new lead data into a Google Vertex AI node (center) which generates an email draft, then a SendGrid node (right) sends out the AI-written email.
Benefits: Privacy, Automation, and AI-Enhanced Productivity
Let’s recap why this approach is so powerful for sales teams:
Instant, Personalized Follow-ups: The workflow engages leads immediately after they sign up, with an email tailored to their info. No more waiting days for a manual follow-up – response time is near-instant, which keeps leads warm and impressed . And because the content is AI-generated based on each lead’s details, it feels personal and relevant, not like a generic template .
Hours Saved on Repetitive Work: Your team saves countless hours each week by offloading the first draft of emails (and even initial paperwork) to the AI . Instead of writing similar emails over and over, they can focus on high-value interactions. The AI drafts consistently formatted, professional communications every time , so nothing falls through the cracks.
Automation with Human Oversight: By auto-saving drafts in SendGrid (or sending with a CC to a supervisor), you maintain control and can review or tweak the AI’s output before it goes out . This ensures quality and compliance, while still drastically reducing manual effort. It’s automation augmented with a human touch where needed.
Data Privacy and Compliance: Because we used n8n and Vertex AI with a European region, all lead data stays within EU servers . This is a huge benefit for GDPR compliance and for industries (like finance or healthcare) that require strict data handling. Unlike some third-party AI services, Vertex AI gives you control over data residency and is backed by Google Cloud’s enterprise-grade security and privacy commitments .
No-Code, Beginner-Friendly: This entire solution was built without coding – we just configured nodes visually. For a beginner, n8n’s interface makes it easy to understand the flow of data. Each integration (Google Sheets, Vertex AI, SendGrid, etc.) is encapsulated in a node you can configure with dropdowns and fields, rather than having to call APIs manually. The result is a workflow that anyone on your team can understand and tweak. Need to change the email text or add another step (like logging the interaction to a spreadsheet)? It’s just a couple of clicks in n8n.
Conclusion
We’ve just built a practical AI automation assistant for sales – a workflow that listens for new leads, uses Google’s Vertex AI to craft personalized emails, and sends them out via SendGrid, all in a matter of seconds. This beginner-friendly project showcased how n8n empowers you to orchestrate AI and automation together: you get the creativity and power of AI content generation, plus the reliability and speed of automated workflows.
By leveraging Google Vertex AI with data residency in Europe, our solution isn’t just smart – it’s also privacy-conscious and compliant, keeping customer data where it needs to be . And while we demonstrated a lead follow-up use case, the possibilities are endless. You could extend this workflow for lead scoring (e.g., have the AI rate the lead’s quality), for drafting follow-up sequences, or integrate other tools like CRM updates and Slack notifications.
Ready to supercharge your sales process with no-code AI? Give this a try in n8n. With a bit of creativity, you can automate away the busywork and ensure every lead gets timely, customized attention. The result is faster response times, more productivity, and peace of mind that your data stays safe. Happy automating!
Resources & References:
n8n Documentation – Using Google Service Account credentials (for Vertex AI)
Google Cloud Docs – Vertex AI data residency and compliance
Community Example – User story of automating lead follow-ups with n8n + AI
n8n Blog – Intro to n8n and AI workflow integration (Vertex AI overview)
Want a solution like this?
Enter your email here and we'll get in touch with you.